Thursday, 19 July 2012

The Legends of Old Lead: Pete Taylor


There are many myths about the Golden Age of Citadel Miniatures but few true legends. 


Pete Taylor is one such legend!

The guy was a machine of miniatures. To this day I am amazed by his output back in the 1980s and early 90s, truly massive armies, epic conversions (when converting was really, really tough) and wild, wild paint (not pant) schemes. He was rewarded with frequent inclusions in White Dwarf and  immortal appearances in Warhammer Armies and The Lost and the Damned.


Let's hand it over to the man himself to explain what started him off on such an epic journey. 

"As far as I can remember I started collecting fantasy miniatures at age 13 although a small group of us were playing Dungeons and Dragons before this.
2nd edition WFB had just been released, although through a friend I also had access to 1st edition and the Forces of Fantasy supplement so it is reasonable to say I have been in the hobby for most of its existence.
Like many I first came to fantasy via Tolkien's The Lord of The Rings so my first impulse on starting to play WFB was to collect Orcs. In second edition you could take Chaos warriors as leaders of units for any chaotic or evil race (and neutral I think) which allowed a kind of warband feel to the army, I liked this and in my minds eye I always imagine all my chaos and evil armies to be part of one huge chaos horde and one day I would love to play the game with everything I have all at once!"


Play a game with everything at once Pete? That would truly be a 'great and noble undertaking' to misquote Eisenhower. 
"Over the years rules have changed and armies have become less diverse which has led to my collecting forces of various sizes for most "bad-guy" armies.
As the years have progressed I have played less and less but have continued to have bouts of collecting and painting.
I went to the last ever Citadel open day at the old factory and was greatly influenced by a huge display put on by "The Players Guild" which featured a besieged castle surrounded by a horde of evil creatures, to this day I much prefer the sight of huge units and large monsters to small tournament armies with ridiculous amounts of special rules and magic items."


Some important key words here; 'less diverse' and 'small tournament armies'. The very things that are the very antithesis to Oldhammer. Its sad to hear that the giants of the hobby are being cast aside by the tournament heavy nonsense of recent times.

Pete is my number one inspiration when it come to painting and gaming. Firstly, he loved Realm of Chaos in all its 80s glory, he paints prolifically, enjoys huge units and uses colour in an intriguing way. Secondly, his collection is MASSIVE. And that collection is largely PAINTED. Something I'd like to be able to say one day.

Below is a fantastic gallery of a tiny part of Pete's collection, culled from various websites from around the internet. I also have a massive collection of his White Dwarf stuff which I'll post some time in the future. 

Original Fleshounds make up this terrifying unit. 

Juggernauts of Khorne with Bloodletter riders. Really nicely done. I'm looking forward to painting my my Khornate Daemonic legion when the Orcs and Undead are complete. 

Keen eyed longbeards will recognise this as a conversion based on one of the old Fighting Fantasy plastic kits released in the mid 80s. 

This collection makes my pathetic efforts look, well... pathetic really. This horde (there is no other word, is there?) is just Pete's undead army. 

I am going to have to attempt to do a banner in that style at some point! Looks fantastic; I wonder where the chaos warrior found the time to paint to?

Characterful orcs lead these chariots.

Frost Giants! Proper old school Citadel here!

Converted Bloodthirster as Keeper of Secrets. I love the colour of the flesh on this piece.


The famous chaos spawn conversion (built from a Fimir body) that appeared in WD and LatD.

A dwarf knight? A GSOH is essential in Oldhammer. 

Again, a lovely skin tone on this Fimir warrior. I am going to have to copy it myself.

That lovely skin tone used on a standard Keeper of Secrets. 

Plaguebearer. Classic!
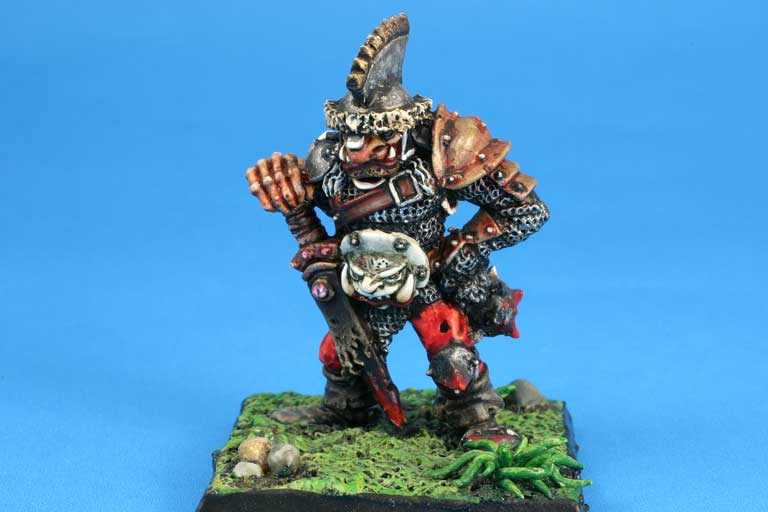
Pete's version of the iconic Warhammer ogre by Jes Goodwin. 

Crazy Nurgle Conversion!

Check out more of the master's work here and here.

Be inspired!

Orlygg.

Wednesday, 18 July 2012

No Grand Plan: One Year's Progress

So its been one year since I abandoned my hobby.

Fed up with price increases, endless new editions, far too frequent use of adjectives such as 'cool' and 'awesome' to describe things, terrible White Dwarfs, I left the hobby.

Packed up the paint brushes. Put away the pants. Retired the files and blades.

But how I missed it!

So I decided to 'go retro' and collect, paint and game with classic Citadel Miniatures and original Citadel paints.

I thought that I'd be, largely, on my own - but Oldhammer has developed, and painters, collectors and gamers with similar interests to me exist the world over.

It is certainly an exciting time.

The purpose of this post is twofold; one, to unashamedly blow my own trumpet and, two to, inspire me to get on with my plan (pulling the finger out) to have these armies completed in five years time. What you are about to see consists my entire output over that last twelve months. I must admit, there have been times when no paint has touched lead for some weeks but I am still amazed at what can be achieved over relatively a short space of time by a working father of two, as well as playing the Witcher 2 and Skyrim in my free time!


Warhammer Armies style posing by yours truly. Next year, I'll be able to wear my Oldhammer T-Shirt!


Orcs, goblin wulfboyz, bloodletters and skeletons 


More of my skeletons, a hidden fleshound, a chaos sorcerer, minotaurs, beastmen and champions of Nurgle. 


Beastmen and thugs of Slaanesh with a hidden champion of Tzeentch- can you spot him?


Skaven, a troll, a champion of Slaanesh, some obscured chaos hounds and beasts of Khorne. 


A grand total of 81 painted and based Citadel Miniatures. Too be honest, this is more than I have probably ever painted in the last 20 years! There is still so much to be done; my chariot need completing, a Tzeentch Warband as well as continuing to produce units for the Undead and Orc and Goblin armies. Additionally, I am trying to devise a scenario to play that will get 99% of these miniatures onto a wargames table. Any suggestions to help with this particular endeavour would be appreciated!

I better order some more brushes!

Orlygg.

Tuesday, 17 July 2012

Arcane Armorials: 80s shield designs the hard way


Over the last few months I have had a number of enquiries about the 'citadelesque' style of hand painted shields that I have been working on. I am often asked 'how do you do them?' or 'can you do a quick guide?' 

Well, this afternoon sees me with little do do but paint and I fancied working on my shield painting, so I have whipped up this quick tutorial to producing the classic 'citadel face' that John Blanche liked to plaster across every surface back in the day.  

A GUIDE TO PAINTING CITADELESQUE SHIELDS


To start with you need your shields. I prefer the large, circular ones though any shape shield will do. I always keep the shield on the sprue, this makes them far easier to work, and if they are loose I tend to blue tack them onto a fizzy drink lid. Undercoating is best done with a couple of layers of very thin white paint. 


Choose your base colour. Again, like the white undercoat, do a couple of thin layers of your chosen shade to create a good coverage. Leave them out to dry completely until moving on to the next stage. 


I like to use '80s inks, I prepare a wash in a darker shade of the base colour and wash this over the entire shield, with a deeper shade in the recess. This wash needs to be left to be totally dry before moving on. 


At this point, you need to decide if you are going to mount the shields on a figure using a boss or plan to attach them flush. Here I have used a tiny blob of greenstuff to fill in the centre of the shields. Don't worry if you scratch off a bit of the paint at this stage.


Tidy up the shields by using your original base colour. Leave the edge shaded with the ink wash. Use a nice dark black to paint the outside of the shield. 


While the base colour is still wet, carefully blend in the original shading wash once more. Ensure that a nice dark shade is in the recess around the rim. You might want to use a watery black ink for this. 


Using slightly watered black ink, create the initial facial shapes for the eyes, nose and mouth. Don't worry too much about being precise at this stage, these are just guidelines.


Return to the base colour once more and begin to work up the detail. This needs to be pretty precise, though you may want to leave a little dark shading around the nose and eyes. Tidy up the mouth area here and it will pay dividends in the future.


Add the second stage of highlights by adding white to the base colours. This is the point you can start to build up the expression on the face. Creases on the forehead are good ideas as are lines around the nose and mouth. 


Add further detail on top on that layer using a lighter shade (just add white) and, again, build up more detail. Highlight the lines on the face, nose and around the eyes and mouth. 


The final highlight (again just add white to the mix) should include the final details around the nose, mouth and eyes. Highlight any wrinkles or creases here. Wait for this layer to be totally dry before proceeding. 


Add some ink glazes. I used purple/blue mix on the left hand side and yellow on the right. You may want to experiment with this stage as the ink can create some startling effects. This will need to be totally dry before you move on!


Start adding the details. Use white to add the eye balls and teeth. Eyelids and lips are also added here. Try and use contrasting colours at this point. Make sure that your white paint is watered down so that it flows accurately from your brush. 


Use black ink to add definition and detail. Highlight the eyes with a third colour and use white to create points of reflective light. Define the teeth carefully and add the pupils, eyebrows and nostrils. 


Continue to add details using black and other coloured inks until you feel the design is complete. Don't overdo detail, less is definately more here. I leave the rim of the shields unhighlighted black (as was the case in the 80s) but you can also paint the studs a nice metallic colour. I have reduced the size of the image here to reflect the size that the shields would be on the figure.

INSPIRATION

You can draw inspiration from many places. Historical picture books have lots of interesting faces to copy, particularly gargoyles from medieval manuscripts and cathedrals.Of course, the master of the shield design was the original 'Eavy metal painter; Colin Dixon. Here are a collection of his designs from my Warseer Project Log.


Have fun painting those shields. The sky is the limit with these.

Orlygg.


Monday, 16 July 2012

Arcane Armorials: How do I solve a problem like citadel plastic shields?

Don't you just love them?


Citadel plastic shield sprues from the 1980. I have a large number of them, bought craftily on eBay mind, as some people sell them (if sell is the right verb) for enormous sums. I also have a mountain of loose shields I have picked up here and there. I am particularly partial to the large round shields as they are idea for some lovely citadelesque shield designs.

Trouble is, they are finite in number.

Recently I was reading a blog, the excellent Closet Gamer to be precise (check it out here), where Matt was having trouble procuring the old Marauder plastic shields for a project. I too had had similar woes and had set about trying to find a cheap, and economical, solution to the bane of many a leadhead's life.

I found that solution in...

INSTANT MOLD (bought on eBay: just search for Warhammer mold)


Here's what the stuff looks like when you are searching. I paid £10 for my pack though you can get single sticks for a couple of quid. I used three sticks when moulding my shields.


My remaining sticks from storage, in case I have to mould something really, really big! When these arrived in the post I was surprised how small they were but they do go a long, long way when heated. 


Here's my battleworn Instant Mold that I use day to day. The beauty of the stuff is that you can use it again and again. Just dunk the putty in boiling water, wait for a few minutes and you are good to go.


Right, I have chosen two fairly standard shields to show you. I am sure that you recognise them both. The black is a shield from the Fighters sprue and the other is a decorated one (with quite a bit of detail) from the Warhammer Plastic Regiments box set.


Step 1: Dunk your putty in boiling water and leave for 3 to 4 minutes. Make sure that the stuff is nice and soft before hooking it out. And yes, that is my son's breakfast bowl!


Step 2: Fix the shields you want to mould on a flat surface; an old tile, an unwanted CD (or one of the wife's) or spare plastic (as I have used). I have found that this really helps when you have to press the mould down and ensures a nice, crisp finish.


Step 3: Remove the putty from the hot water, mould it by hand into a rectangular block and press down one surface against something flat and hard. This is to create a flush surface on which to press the shields.


Step 4: Press down on the shields very, very gently. It is easy to slip and stretch or distort the mould. Ensure that the whole of the shield is covered and that there are no air bubbles. Leave to dry for 5 minutes.


Step 5: Once the putty has cool its sets nice and hard. Its then just a case of mixing up some GS and waiting for the stuff to be hard enough to work. Just from this image you can see how well the mould has captured the detail -particularly on the plastic regiments shield.


Step 5 (cont...) Just press the GS into each of the moulds and ensure that the coverage is good and even. I used by thumb and fingers for this job as its easier to apply the pressure you want.


Step 6: Then press down the GS on something nice and flat. This will even up the GS as well as eliminate your finger prints.

Then leave the GS to harden, remove it from the mould, trim and file a little... and you are done!

No more shield woes Oldhammer style!

Additionally, they also sell and permanent mould called Blue Stuff. This is a few quid cheaper and can be found just as easily as Instant Mould but I haven't tried this out yet.


Sunday, 15 July 2012

Oldhammer Painting Competition: Da Golden Gobbos: Errr, so how do I complete my entry?


Thank you to all the bloggers out there who have signed up to the first Oldhammer painting competition. If you haven't signed up yet (then, why not?) all the details are available here.. I have had a few queries about how to package together your entry when the final drop of paint is dry and the background fluff completed.

Hence this post.

It is going to be easiest to whack all your details onto a WORD document and then email it to orlyggjafnakol@hotmail.com. This will make it far easier for Oldhammerers to manipulate the text and images. In case you are unsure, I have mocked up a fake entry to give you some idea of what to put together. Obviously, this is just an example... not Orlygg's entry!!

Flayface the Disemboweller 
Level 20 Human Champion

Statistics  
M  WS  BS  S  T  W  I  A    LD   INT CL  WP 
                                             4    6     4    4  4   4   6  4   10+3    7     8+1  8+1

Equipment 
Heavy armour with double handed flail. 

Background
For all the reasons that men turn to chaos, pride is, perhaps, the most foolish. Flayface was one such fool. Raised my his mother, with disputed fatherage, in the small Kislevite village of Popov, the boy, who would one day become a feared champion of chaos, was ill remembered by his peers due to his enormous capacity to boast and lie. If the children were speaking of how far they could swim, he'd have swum further; if the children discussed the effectiveness of slings, his would cast a stone further; if the children spoke of who's father could harvest the most wheat, his would be able to fill eleven wagons, even though he did not know who he was.  

As can be imagined, the boy who would become Flayface was an outcast amongst his peers. They'd disperse rather than socialise with him, and so, in time, this boy became a curious loner, spending his days wandering the ancient forests that hugged the rocky highland around the village. On one such day he met a twisted, diseased beggar who had sat for a rest alongside the Koldski Lake. The man wore filthy, stained clothes that hung in tattered strips from his emaciated limbs. The beggar spoke and the boy, unused to attention, spoke back. 

No-one is sure what conversation took place. Those who mutter dark names in the night tell a story about how the beggar told the boy of the diseases that blighted his body. How each and every day was a struggle against pain. The boy, of course, had to do better and told a tale about how his body had just recovered from the foulest of agues; cast down by the Lord of Flies himself! The beggar is said to have been impressed. And is said to have smiled paternally as he left the boy by the waterside.

A few days later, the boy complained to his mother of a headache. She did her best to nurse him but within days his head had begun to swell and distort hideously. His skin turned from healthy pink to a sickly, speckled yellow. In time, it began to form the shape of a goat. The mother, perhaps out of love, perhaps out of shame, did her best to hide her child from the world but she could do little to lighten the stench that hung around their home. 


The locals gossiped, then accused, until the tensions came to a head and several men stormed the stinking house. Casting the mother aside, they thundered into the boy's chamber to find a hideous thing. The boy's skin had slipped in a necrotic flap down from his skull to hang like a grotesque bib at his neck; his goat like skull was now exposed to the elements. Appalled by the sight that had befallen them, the men stood frozen, giving the boy, now Flayface, time to scramble from the room via a beckoning window and make his way out into the wooded hills. There he finally found his father; Nurgle, Dark God of Pestilence and Decay. In time, he would rise to be one of his most favoured champions.


Well there we go. I only included a single photo as that was all that I had kicking around this morning when I wrote this post. I see no reason to limit the number of photos you send in but, obviously, we cannot look at hundreds of them! I'd imagine a front and back shot is going to be quite useful for voting though. Hopefully, this clears up the few questions that I have had. If you have anymore just email me!


Enjoy your painting!

Orlygg