Showing posts with label Scenery. Show all posts

Friday, 30 December 2016

Is it normal to love Warhammer Townscape so much?


If you could pick one defining product from GW's history, what would it be? I suppose that would depend on what you would consider 'defining' to actually mean, for me at least, the word refers to that singular release which, for what ever reason, outshines all of the others. Many of you may well point me towards the Realm of Chaos books, particularly the first volume Slaves to Darkness, as a seminal release. And you may well be right, but for old Orlygg nothing outshines Warhammer Townscape. 

I cannot really communicate how much joy this release has brought me over the years, though sitting here now I am struggling to determine exactly why I love the book (which it essentially is I suppose) as deeply as I do. Sure nostalgia plays a big, big part and I guess it is here that I must begin, as understanding why someone adores a particular football team, song or meal is laced with memory so I guess I better start sharing mine. 


Like many of us, my first exposure to Townscape came via White Dwarf magazine. I lived too far away from Wonderworld (my local friendly gaming store in the 1980s) to browse items off the shelf or actually talk to another with a deeper knowledge of GW products than my own. Of course, in the pre-internet days mass communication of this nature was only possible through print media, and the monthly journey to the newsagent for my copy of White Dwarf was an adventure in itself. 

The advert above was my first exposure to the book. And it captured my imagination in a way that still inspires me 27 year later. The look of those buildings, all different, impressively stacked row on row filled my mind with wonderous possibility. I could have my 'own' fantasy town? A town complete with temples, houses, halls and inns - all of which I could build myself with the help of my trusty prit-stick and PVA bottle? 

Of course, it wasn't available yet, was it? Not that that mattered one iota as I didn't have a great deal of cash back then. Still, with Christmas around the corner I knew exactly what I wanted Father Christmas to bring me in my stocking so promptly informed Mum or Dad what I was after. While I waited for the year to turn, I scoured White Dwarf for further adverts or images that would relay to me what I was getting. I knew a fair bit about constructing card buildings as I had a long fascination with those cardboard castle kits you could pick up for a few quid at a National Trust site. And my own father had built cardstock buildings for his model railways too. Though a far smaller scale and rather bland and uninteresting, I had built signal boxes and station platforms before and new the basics about cutting, scouring and gluing (well, at least I thought I did).

Christmas game and I recognised the shape and size of a GW book under the tree almost straightaway. It was the first item that I opened and I can recall my mother being somewhat puzzled why I had shown little interest in unwrapping anything else. Of course, my parents were extremely reluctant to allow me to get my scissors, knives and glues out during Christmas morning and I had a frustrating wait until the afternoon before I could get started. 

Being young, I chose the largest possible building to start with - the notoriously hard to build Watermill. Having cut out a few of the pieces I quickly gave up on the model due to its sheer complexity. Instead, I built the gatehouse model with the tunnel passing through it. I didn't realise at the time that many of the buildings in the set came from prior releases and this was why I recalled seeing a  photograph of some skaven in front of it. It wasn't long until I have built about eight or nine of the buildings (mostly houses) and had a larger collection of them than painted figures! Those initial builds saw some serious gaming action and I can remember fighting battle after battle on my bedroom floor with the buildings dotted around. 

What happened to those first builds? God only knows but they were pretty grottily built if truth be told. My scoring was often rushed and my gluing skills were not what I thought they were. Slapdash may be the right word when describing those early efforts but the buildings I had in my possession I loved so, so much and used to proudly take them around my friend's houses for adventures. 

Later on in the '90s I built the remaining buildings. It was during one long summer that I rediscovered the book in my cupboard and that sense of wonderous joy filled me again. That fantastic feeling of limitless possibility. Of course, my natural compulsion to 'make and do' was also a huge draw and I spent many happy afternoon sat out in the sun assembling the remaining buildings. My skills have moved on considerably in the previous years so these models were much better constructed - though I still hadn't learnt the importance of basing the buildings to make them stronger. 

Those models travelled around with me for a few years until I stored them in my dad's attic. The place wasn't particularly dry and the old card models went damp and mouldy. Dad chucked them out for being a health hazard. I wasn't that fussed at the time. 

Throughout the rest of the '90s the interest was always there at a low level. If I saw anything remotely GW like I would snap it up from car boot sales or charity shops but booze and girls now occupied my waking hours and old metal men and their support products were of little interest. After I was married and found myself in possession of more cash and my own home, eBay called to me repeatedly in search of Townscape. I wanted to feel that excitement again - even if the book itself just sat on my shelf. But tracking down a complete copy of Townscape was much, much harder than I expected, even in the pre-Oldhammer days when very few people actually wanted old GW stuff. 

From time to time, half complete sets would come up for sale and after about 18 months of searching I managed to piece together the book once again - this being my 'never to cut up' edition. I am happy to say that it safe with me here as I type. I love flicking through the book and spotting all of the little GW in-jokes on the signage and posters, stuff that went way over my head back in the day. I am also lucky enough to have a three-quarters complete version as well, and it its from this copy that my card stock buildings that you see in the background of my miniature shots come from. 


Despite my love of these card buildings, I had only actually built three of them to date; the yellow faced house you can see in the photograph above, the watchtower and the rough inn from McDeath. This all changed yesterday when I had the entire morning and afternoon to myself. Wife and kids had taken a trip into London and this left me with plenty of time to spare. I have been suffering a great deal over the last year or so with what I thought was a hernia, and the associated pain and discomfort made it difficult to sit and work for any great length of time. The complete rest I had over the Christmas break meant that I was feeling pretty good and was looking forwards to spending a rare bit of hobby time at my bureau. Of course, the lure of Townscape over such an event was impossible to resist and as I am resurrecting my McDeath project, I decide to build the remaining models required. 

The stone toll house and the infamous windmill. 


I ended up building a little more than that. Both the buildings I needed were spread over two pages so I decided to build everything else printed on to the card as well so I ended up with a couple of tents, a doghouse and the outside lavatory. 


And here they all are based on thin card taken from the back of a pad of paper. They are not quite finished yet either, the white score lines are quite obvious once the buildings are assembled and I find them quite unseemly. Using a little watered down black paint, it is easy to paint over these and give the models a little more depth that helps finish them off. Now you may well be wondering why I keep calling the windmill model infamous - well if you ever built this thing back in the day you will no doubt recall that it was forever falling over. The sails made the construction quite top heavy. I used a lump of old metal model to add a little weight to the base and this has really helped make the mill more stable. 


As the McDeath scenarios require this building to double as the malthouse (to do this, you remove the sails) I didn't want to attach them permanently. I used a small piece of balsa wood and a drawing pin to create a detachable sail. Both the wood and the pin will be painted black at a later date. 

I still have plenty more card buildings to put together but I shall save them for another day. Sitting surrounded with all the cut of strips of card, my ruler and knife with the sweet smell of copydex in my nostrils was fantastic and left me feeling suitably energised about what my next hobby project would be. As I put away both of my Townscape copies I started thinking if it is 'normal' to love a set of card buildings quite so much. 

Was there more than pure nostalgia at play?

Looking over the book with fresh eyes what really appeals to me now is the variety of the building types. There are loads of simple dwellings in which the common man of the Warhammer world would have dwelt. Some are ramshackle, while others are far larger and more opulent. But they all seem real and are not overpowered with skills, astronomical symbolism or burning braziers. Reality is, for me at least, essential to any successful fantasy setting. If you cannot believe in it, if it doesn't make sense then how can the fantastic elements work? Normality is essential for the incredible to appear incredible! 

I guess the range and simplicity of the models is a big draw. 

The artwork also rings a chord in me and the look of the models seems to compliment the painted Citadel miniatures in my collection. They make the perfect backdrop to you latest work. Despite not being overdesigned, there are lots of humourous details hidden away on the cardstock buildings, my favourite being the Slann in Space pub sign and the wanted Perry brothers posters. 

I suppose to answer my question, it is normal to love Warhammer Townscape so much because it is a fantastic product. Even thirty years later, if you can find a copy in reasonable condition you could make an entire town's worth of models. And that is a lot of models for any wargaming table. With a little work, you can add additional tiles, weeds, moss or even drain pipes if you were so inclined. 

Warhammer Townscape is old school Warhammer at its very best and deserves to be in the collection of any serious enthusiast. 

I am so glad that it is in mine and I love it! 

Orlygg


Sunday, 13 September 2015

Seeing the wood for the trees


Bah! It has been a few poor weeks of Oldhammer for me. A mixture of going back to school, family weddings and other unavoidable events has meant that I have done little but undercoat my nurlglings in white, basecoat them and brush over a depth wash. A poor show indeed. And with the coming week looking no better I was in a glum place indeed yesterday, trapped as I was away from home.

I was away with the family in North Essex. I took with me (as a last minute occupier) my Warhammer Third Edition rulebook, with the intention of flicking through it during the dull moments in the hotel room. The image above always impresses me during moments like these. The famous photographs of the 'The Duke's' terrain circa 1987 can stir the soul of even the most jaded wargamer and put all of our feeble efforts to shame even with the wealth of modern modelling technology at our disposal. 

It is my dream to do something like this one day, on the same scale, as I have said before. The buildings are obviously versions of the Townscape buildings, though I am not sure if these are well doctored card versions or carefully made balsawood and card replicas. Does anyone know? What ever they are, they fit together very nicely and produce a gaming space that looks like a real place. Not silly random hills, or skulls, or rivers of blood here. Just a thing of beauty. 

The trees always fascinated me. I can remember looking at them back in the 1980s and wondering how the Duke made them. My father was a railway modeller and I was used to the idea of making everything from scratch because that is what he did. I was also no stranger aged 10 to the dreaded 'Railway Exhibition', where I was exposed to a great many layouts with all manner of trees. 

I never saw any as great as the Duke's though. 

I can also remember trying to recreate something similar to what we can see in the picture with sticks and moss from the woods. They looked great, at least to my young eyes, but my mother wasn't best pleased when she saw all the dirt and twigs that came into the house alongside my brilliant new forests. 

So they went in the bin. 

I have toyed with making trees of my own, and they have appeared in many of the photographs I have taken of my own models. These I constructed form my son's old milk bottle brushes, and they were simply cut to shape, sprayed black and coated in PVA. A quick dip in the flock and they were away. 


And here they are in this old photograph from a few years back. They are quite effective, and they are really rather cheap to make when you think about it - not that I would want to make many of them though, as they are rather dull to construct. I forgot to mention the trunks - I added greenstuff to them and modelled on some bark effects in case you were wondering. 

Still, they are not a patch on the Duke's. 


Let's not forget that Games Workshop produced their own trees too. As you can see above, it was in the familiar guise of the plastic kit. I think these were probably the last thing I ever bought from them before I went retro. They were well sculpted I suppose, with a useful base which allowed you to remove the tress if you so wished. But the leaves looked flat and naff, and if you wanted a larger patch of forest on your table you' have to fork out a fair bit of cash and paint the same three trunks a fair bit. But that's modelling I guess. 

Whatever. They were okay, but they weren't a patch on the Duke's. 

I was left to wonder, as I often do, of the day I'd be able to have the space and time to build a mighty table of my own as I wandered around the town we were visiting. I had a bit of time off, so I had taken the kids down from where we were staying and out to the shops. The event not being 'my family' as such, I was pleased to have a little time to myself. I noticed one of those junk/antiques shops that every old market town in England seems to have, and ushered the children inside. They are usually worth a few minutes distraction and you can occasionally find cheap books or toys that interest the children. 

Catching my eye amongst the bric-a-brac was a glass display packed full of agricultural toys. Tractors, combine harvesters, cows, farmers, fences and so on. And there, alongside a giant plastic 1970s barn were the Duke's trees! 


So I bought them.


I had no idea that they were commercially available and were, in fact, toys. They were produced by Britain's and are quite collectible among fans of the brand. So collectible that the shop owner wanted £20 for each tree. A quick glance on eBay's sold listings proved the shopkeeper correct, only that seemed to be for the mint boxed versions and the two I found in the shop didn't have boxes. Nor were they complete, and one was damaged. In the end, I managed to haggle him down to £15 for the pair and very pleased was I too. The trouble was, they stank. Musty is not the word and the wife was moaning in the car all they way home today about their smell. I have since washed them up in warm water and washing up liquid and they seem more pleasant to be around. 

Laying the parts out to dry, I was amazed by the detail and variation the models provide. For example, there are seven different types of branch that can be attached in various ways to the trunk and a large number of different foliage pieces. I have spread them out for you to see above you. 


I am really pleased to have found these, especially as eBay seems a pricy place to acquire these excellent models. They are quite the best tree kit models I have ever seen, and when you consider that they were probably designed and produced in the 1970s its even more astonishing. They are brilliant. What is more, the shop keeper threw in some other bits from other Britain's trees for free when I explained to him what they were for. 

It seemed, that he had been a Warhammer player back in the 1980s. A small world indeed. 

Now all that I need to do is find the time to construct these properly (using glue) and get them painted to a decent standard. They are huge when put together and easily tower over my tallest models, just like an oak tree should. I heartily recommend chasing a few of these down if you have the coin. One thing bugs me though. No matter how well I put them together or how well I paint them...

They won't be as good as the Duke's. 

Orlygg.

Sunday, 26 July 2015

A Dark Deranged Structure: Building McDeath's Winwood Harbour on the cheap!


Hello once more, my friends. As you will recall, one of the challenges I set myself some time ago in regards to my McDeath project was a custom board on which to play each scenario. Unfortunately, pressures of life (not to mention rather grotty weather) held me back from achieving this goal. However, with a week to go until the Oldhammer Weekend I needed to pull something out of the hat in order to get the game put on at all. So with the knowledge about how to create a Wargames table for next to nothing, I set about creating a small skirmish board from stuff I found lying about the house. This blog post will show you how I did it. 

As you can see from the image above the two main components for the Wargames table were foam board and two pin boards. Both of these items are strong and more importantly, light and make an ideal base for the cost effective gamer who lacks storage space.


The second stage is two cut out the foam board so that the interior of the pin boards are totally filled. Careful measurement beforehand will ensure that the foam board you buy will fit the recess of the pin board. I used PVA glue to stick down the foamboard ad left the glue to dry overnight.


Once suitably dry, I used a felt pen (and the Winwood Garbour map in McDeath) to design the layout of the gaming board. I included a little coastal area to represent the sea, space for the village as well as the road, hills and playing field. I used the card buildings as a rough guide to what I wanted scale wise around the the village area. Finally, I cut out the foam board in the bottom corner to create a little depth for the beach. 


Sand is the familiar friend to many a modeller and I added it to the parts of the board that would require texture. In the past, I have covered the whole board only to end up never seeing my handiwork once the flock and static grass stages have been completed. 

To create some height I used some more foam board to create hills. From experience, nicely contoured hills look great on the table but are a bit of a pain to balance metal models on. As a compromise, I opted to use staggered stage hills inspired on the classic set up in Warhammer Fantasy Battle Third Edition. I just cut them out with my knife and glued them down along with the sand. 

Again, I left this overnight to dry.


I undercoated the board in brown paint and left it to dry in the sun. I have always been amazed how useful a good hot day is for building Wargames tables as a good thirty minutes outside can dry glue or paint rapidly. Any bits of paint that the sun's heat missed, especially around the edges of the hills, were finished off with the hair dryer. 

Using a white spray paint can, I gently undercoated the lighter textured areas of the board. I sprayed along the road and the beach area quite carefully and then completed a second coat along the centre of the path and the top of the beach. 


For the next stage, I mixed up some very watery paints. Using an earthy brown as a base, I created a darker shade, a mid tone (by adding a great deal of yellow) and a lighter yellow. These mixes are extremely thinned down and have a similar consistency to washes. 


It was then very straightforward to apply them. Using a large brush, I dabbed them on along the textured area and allowed the different tones to mix together, spending a little more time on the beach area and attempting to get the beach a little more sandy in tone than the roads. 


Strategic use of the hairdryer helped here too, and after a while the whole of the board was covered and dry to the touch. 


I drybruhed up the textured areas in much the same way as I do my bases. I used a mixture of brushes and tried to keep the directions of the strokes different. I ended up using a white for the final highlights. Be warned though, this process will kill your brushes! 


The final stage, and my favourite, was the flocking. I just coated the board in PVA and sprinkiled on my darkest green static grass. Over the next few hours, I added other tones of static grass to try and create a more natural feel to the surface. I also took advantage of the Gale Force 9 and Army Painter products I had hidden away. These helped me create patches of flowers, bushes and tuffs of high grass, all of which add character to the table. 


A quick test with the models and scenery and we are nearly finished. I just have to add the water effects to the beach area tonight. 


As a final touch, I painted the edges of the pinboard black to create some definition and tidy the table up. 

I am now all ready for the first game! 

Friday, 10 October 2014

Old School Fantasy Scenery Articles


As many of you will know, I have been working on a large scale scenery project since mid-summer. I have so far constructed two fantasy cottages and a medium sized wargaming table. Further details about the buildings can be found here and here while my attempts at game board construction can be found here

But there is much more still to be done. And I have a third cottage yet to complete! 

After that project is complete, my next step is to construct a series of walls, hedges and fences to create a village of sorts on the table you can see above. In doing my research, I came across a chap online called Attilla13 who had been kind enough to scan many of the articles I have been using as inspiration for my old school table. 

If you are not aware of these early articles, they were published in the very late '80s and early '90s and were mostly written by Phil Lewis (who has been interviewed here at RoC80s) and the well known Dave Andrews. 

Some are still missing as scans (though I do have them in my collection) and these include the original fantasy cottage article that I based my buildings on and a dwarf mine. Hopefully, these will make their way online at some point in the future. Until then, enjoy Attilla13's efforts at preserving these tasty slices of gaming history. 
HOW TO MAKE A FANTASY TOWNHOUSE


HOW TO MAKE WALLS, HEDGES AND FENCES


HOW TO MAKE A FANTASY BARN


HOW TO MAKE A RUINED TEMPLE 

How to Make Wargames Terrain - Ruined Temple by Attilla13


HOW TO MAKE A COACHING INN


As a closing point, I  can share this photograph I took of Bryan's collection with you once again. If you peer into the rather unfocused rear of the image you can make out the ruined pillars from the temple article I have shared here. It makes me wonder what other relics from these early forays into proper scenery have survived into the 21st century!


Tuesday, 2 September 2014

Old School Fantasy Cottage with Extension


I have spent the last two evenings working on the paintjob of this lovely Fantasy Cottage. It is, of course, based on the Phil Lewis' classic cottage from WD 130 which I built earlier on this year. To create a bit of variation, I added a second room as an extension on the left hand side and this was built very simply using exactly the same methods as the rest of the house. In hindsight, I feel that the sloping roof on this extension may not be pronounced enough but no matter, as its now complete and ready for the tabletop. 

As you will probably see, I changed the mix for the colour of the roofing tiles, switching from Ultramarine Blue to Enchanted Blue and this resulted in a far more fantastical (my son as Disney) colour. Again, in hindsight I am not sure if I am totally pleased with the effect and may well try out a third blue next time I build a cottage (I have one more that needs completing) but I shall wait a see how I feel after a  few games with it on the table. 


I also varied the colour of the brickwork on the chimney flue and I am a lot more satisfied with this. The colour is warmer and much more brick like. Inks were mixed in different combinations and amounts to help weather the stone. Flicking painting in different hues over the brick work also helped to age the building somewhat so it fits suitably into the fantasy world of old school Warhammer.


The walls themselves were very easy to achieve. I painted the boards with a Bleached Bone/Flesh mix and undercoated the wooden beams with Flat Earth, from the Flames of War range - as its very similar to the old Snakebite Leather colour of old. The wood was then washed with brown ink and drybrushed back over with flesh and Bleached Bone once again. Green and yellow inks were then employed to weather the wood and pannelling in places. Finally, I worked up the walls with white until they looked suitably bright enough. The whole wall section was then aged with ink blobbing and paint flicking. 

You have probably noticed by now that the roof has been treated a similar way with inks and flicking. Only here, I used black and white paint to suggest age and the droppings of all those fantasy birds! 


I made the windows a little warmer in tone. I used Ultramarine Blue as a base before washing over with blue ink followed by green ink. When I dig out a bit of gloss, I intend to paint of the surfaces of the windows to make them shine light glass. The final touch was to add a little chimney pot, made from cutting off a section of the plastic tube that protects new paint brushes. 


And here is the finished job alongside my original model for comparison. Critical comments please as I am keen to apply everything I have learnt to the final building I am going to use to represent the little crossroad hamlet on my battlefield.

Also, if you happen to know of any links where I can find odds and ends to decorate the bases I would also be very grateful - you know the stuff I mean: boxes, barrels, tools, animals etc.

Orlygg

Sunday, 16 February 2014

A Dark Deranged Structure: Old School Fantasy Cottage Tutorial: Construction

My original cottage. Built and painted using advice from Phil Lewis and Dave Andrews from an ancient WD article. I have since repainted the stone work though, as I wasn't happy with the brick colour.
A couple of weeks ago I posted a little article about the cottage I made inspired by the old Modelling Workshop articles that Phil Lewis was involved in. After reading his account, I found myself flicking back through the White Dwarf archive and pulling out the old issues that contained his work. He didn't do it alone though, for much of the work was done by Dave Andrews. Together, they produced fantastic articles for the cottage, a two story townhouse, walls and hedges, a larger town house, mines and shacks and a ruined temple. Later on, there were some other articles by other people, though these were not up to the same standard as Phil's and Dave's work, but they are okay. 

Anyway, I had lots of requests to explain how I built the old school cottage and I promised several people a full article explaining it all some time ago. Well, as its Realm of Chaos 80s's birthday week, I thought it appropriate to write up the article in full and share it with you. Its proved to be a bit more of a task than I expected, so I have had to split the article into two posts. The first will deal with the construction of the model and the second will deal with how I went about painting the piece. 

First up, here is the original article from White Dwarf 130. Looking back, this article is one of the most memorable pieces that I can recall, along with the WFRP stuff. As I have said before, I had a brilliant time building my own boyhood version of this (and I really enjoyed the latest effort too). 


The original article is pretty clear about what you need to work with. Foamboard. Now, this stuff really is easy to work and is really simple to get hold of, either online or at an arts and crafts shop, such as Hobbycraft here in the UK. You could also use thick plasticard, though this is much harder to cut. I chose foamboard as I had loads of sheets of it lying around unused in the house. 

Anyway, I just printed off the scheme from the article, enlarged it and then stuck it onto the foamboard as the article suggests. Using the wife's pins, it was fairly simple to create the the outline and slice the sections out using a sharp blade. Once this has been done, I stuck the foamboard together with Copydex. Now, I don't know if you have heard of Copydex before but in my opinion it is the best stuff out there for sticking card or paper. It sets as a sort of rubbery layer and dries rather quickly so you're not sitting around for hours waiting for the stuff to dry. Its fairly easy to remove too, if things go wrong, with the glue just peeling away like thin sheets of rubber from the card surface. You get quite a bit of movement too, which is essential in model making, ensuring that you can slide the pieces exactly where you want them to be with ease.

Once it was fairly dry, I stuck the model to a plasticard rectangular base and added the roof sections. These need to be thin, so use cardboard. The stuff you get from packets of cereal are best. Be careful though, as some cardboards can warp when wet so go easy on the glue.

The basic shape. I tend to leave the doorways cut out and use blobs of greenstuff, some attached to the top and some to the bottom, to help secure the doorway. In reality, there is no real need to remove the door but doing so allows you to suggest depth.
Leave the model to dry over night. The Copydex will really harden up and you should have a pretty solid model by this stage which will allow for more rough work. To create the timbers the article suggests balsa wood, though I find that matchsticks are easier (and hardier) in this regard. Cutting them can be a challenge so invest in one of the matchstick cutting blades you can get from craft shops. Match sticks have been used for centuries for building models, they are cheap, come in different sizes and are very easy to source. You can follow the pattern on the article or develop your own, remember though, the wooden frame held the building up so your frame needs to look like its up for the job or the finished cottage will look rather odd. 

The match cutting blade is triangular and allows you to apply pressure directly down onto the the match, making cutting a doddle. I bought mine for a couple of quid (along with loads of other strangely shaped blades) at B&Q. 
Once you have the basic frame complete, its time to add the door. A piece of card will suffice, though I use a flat piece of balsa wood and just score in the details. The hinges and things are made from thin card (again taken from the cardboard cereal packet) but I would recommend that you use the coloured side. You see, the coloured side is much more smooth in its finish, perhaps to help hold the printed image, and when painted gives a much better result than using the 'grey' side. This is also true of the roof tiles. Use the decorated side and slowly build up the layers (starting from the bottom) ensuring that the first row, and the last tiles on each edge, overlap slightly. This will allow you to paint them more effectively later on. Use longer pieces on card on the very top of the roof. This will help tidy up the over all finish and will prevent imaginary rain from ruining the imaginary interior. 

Avoid the temptation to apply the bricks as if you were building a wall. Just blob them on randomly and slowly build up the detail. If sculpting is not your thing, you could always buy some of that patterned plasticard. 
I added further details by using green stuff to build up the brickwork on the chimney. This was achieved by making little balls of putty, sticking them on the foamboard and shaping them suitably. Don't forget to produce convincing corner stones for the edges of the chimney, where the brick work touches the wall, otherwise your wall will look a bit odd. Use plenty of water here, as the sticky putty can easily rip away the card backing of the foamboard making it very difficult for the putty to attach itself to your model. You may find it easier to wait for some of the brickwork to dry before going back and plugging the gaps as it gives you the option of attacking the fresh greenstuff to the old. 

The model is now pretty finished. As you will have no doubt noted, I added a side extension, built in exactly the same way as the rest of the house. 
Instant polyfilla is a brilliant way of quickly texturing the walls of the building. Just squirt the stuff out of the tub (or tub) and apply to the wall with a sculpting tool. I find that a downward motion with the flat end of the tool gets the best results. Don't worry if the polyfilla ends up creating little peaks or smears onto the wood. Once its dry, it is very easy to sand down or simple break off to create a neater finish. It goes without saying, but you need to leave the window panes free of texturing so the glass painting looks more realistic. Final details can be now added; flagstones by the doorway, sand and even a small round ball of greenstuff to mimic a doorknob. 

Right, that is all from me. If you need any further advice just comment and I'll get back to you. Otherwise, I hope this article inspires you to get out there an get building your own little cottages. The materials used are most likely lying around your house as you read, so a piece like this can be produced for little or now real cost. 

What are you waiting for?

Orlygg.

Friday, 24 January 2014

Old School Fantasy Cottage

Regular readers will know that I recently interviewed Phil Lewis about his time at GW and his contributions to photography, miniatures and beyond. You will also know that I am being treated from a dental abscess. I find that sitting for long periods, or bending over for any length of time, aggravates the infection and makes life uncomfortable so I have been able to do little Oldhammer stuff but write lately.

So I elected to work on something on a larger scale than normal that could be achieved when standing. I opted for the fantasy cottage Phil Lewis mentioned in his interview. Well, he didn't mention the actual cottage, he mentioned the series of articles he worked on and this reminded me of them.

It is a fond memory of mine the weekend I first used this plan to construct a fantasy cottage. Using various cast offs from my dad's model railway and some specially bought foamboard, I built a tiny little house and decorated it. That model is, of course, long, long gone but its memory inspired me to build another... Twenty five years later! So getting hold of WD130, I followed the article, added my own ideas and produced this, my first piece of Oldhammer scenery!

Timber frames are of course balsa wood, as is the door. The roof was made from cardboard taken from an empty cereal packet. as were the tiles. Door fitting made from the same card as the roof. Door knob a blob of Greenstuff. The building was based in my usual way. 
I had a go at sculpting the walls with Greenstuff. I used several ink washes to dry and make the brick work rather slimy and dank, just like a house would look if it resided in the Reikland of my imagination. 
I textured the walls with quick drying polyfila bought from Tescos. The roof was stained with ink splats and paint flicks. 
The timbering took a while to attach until I used Copydex. Never build a piece of scenery without the stuff, is my new modelling motto. Its excellent!
And here is the scale shot alongside the Muleskinner. I really enjoyed building this cottage and I have just started a second one. This time the building is going to have a lean to extension. 
What do you guys think?

Orlygg

Monday, 28 October 2013

Slaves to Darkness 25th Anniversary: Surviving Scenery Reappears!


We celebrated the 25th Anniversary of Slaves to Darkness with a fairly large Realm of Chaos Warband game at the Wargames Foundry, under the generous gaze of Bryan Ansell himself. It was pleasing to the Dark Gods that so few lovingly painted miniatures fell on the tabletop and carnage has long been their pleasure.

Sadly, we have learnt that the carnage did not stop in the game world, and much of the 80's classics were destroyed when the 80's Design Studio was moved circa 1991. Incredibly, thanks to one Evo Von Himmel we have the chance to glimpse at some of the scenery made for the Realms of Chaos books but rarely actually seen. Here we can present some 'Chaos Trees' constructed by Jamie Sims in the style of John Blanche.

You can just make them out in the picture below. 


Looking at them, they are surprisingly 'un-Warhammery', if such a thing is possible, though they have much in common with the early 1980s John Blanche figures that are now safely stored in the collection of Steve Casey.


I am sitting here as I type trying to work out how these were made. Its hard to tell, and please do comment if you know better than I, but I feel that that the scenery is built from a mixture of wire and mod roc/paper machie. No matter the materials used, the scenery has a twisted, ethereal feel that is wonderfully evocative of the Realm of Chaos before it became a rather generic wasteland. 

When I finally get around to building my wargames table, a set of pieces in the style of these survivors is going to be a must!

If you are interested in reading more about these pieces and won't to know how Evo came to own these, read the blog post below.

http://port-imperiale.blogspot.co.uk/2013/10/raiders-of-lost-skip.html

One question remains though! Who has the others?

Orlygg.

Tuesday, 20 August 2013

No Ventilation: An Interview with Jamie Sims


The Oldhammer Community is an eclectic bunch of characters. As a growing movement, new members crop up almost daily, from all walks of life and nationalities. This is one of the community's great strengths. Occasionally, you meet someone who has an interesting tale to tell and it's a real joy letting them tell it.

One of these people is Jamie Sims.

Initially, we came in contact through his incredible scenery. Jamie wanted to showcase his remarkable work at the Foundry during the Oldhammer weekend. Sadly, a range of factors made this ultimately impossible but I felt his work needed to be seen by enthusiasts of fantasy modelling and gaming, as they were some of the very best I had ever had the pleasure to see. Additionally, Jamie pointed out that he work for Asgard Miniatures in the early days and was witness to a great number of things that will be of considerable interest to the readers of this blog.

RoC80s: Everyone seems to have a different story about how they connected with fantasy gaming. So what's yours?


JS: OK, this is a long story. I got into Dungeons and Dragons very early in its development, in about 1978 to '79. Because of this, I found out about Asgard miniatures who, at the time, were in Commerce Square in the Lace Market, Nottingham. This was in 1981. I got offered a job packing before moving on to casting miniatures. This was at the time when Citadel hadn't even merged with GW. A young John Blanche used to come into our shop to buy our minis, go away and paint them and then come back to sell them back to us for display. It was also the time when an even younger Jes Goodwin came to Asgard to try and start his career off as a sculptor. I can proudly say I saw the first mini he ever made. The boss took it, snapped off two limbs saying; 'this wont cast , and neither will this'. Then handed it back to and understandably crestfallen Jes. It's a credit to the man that he didn't give up right then and there, I've always thought. I've been into the hobby ever since. I've had illustrations in White Dwarf, and in a couple of rulebooks. Additionally, I have made terrain for Realms of Chaos and worked on the 'Eavy Metal team. I've also worked for Target Games, Fantasy Flight, Testors, Paiso + others, and various Computer Games companies. And on a few TV and Movie projects and all this experience has informed how I make terrain and other modelling projects.


Some of Jamie's work. Such a precise level of detail and believability. Playing on models like this is more akin to working with film sets is it not?
With a multi-level approach often evident in his work, a clever GM could concoct a plethora of interesting little narratives and special rules out of his work. 
The skill makes you look at your fragile attempts at scenery and weep bitter tears of envy, doesn't it?
Loads to be inspired by here/ Note the little details of the windows and, presumably, a drain opening.
RoC80s: What got you started building scenery?

JS: At school we did a thing called the English Speaking Board examination (I know its like something from a Victorian novel, but then I am ancient!) and we had to produce a demonstration, which could be anything at all, and speak about it. I had been for some time making Airfix model planes and building little dioramas for them, using chicken wire and papier mache. This was my first foray into modelling scenery, around 1978. Skip forward a few years to when I discovered Asgard Miniatures, and gamers were all playing Bryan Ansell's western gunfight rules. They had a church with a roof that came off, and all detailed inside and many other buildings. I was hooked instantly! I proceeded to make many big clumsy versions myself from ply wood, coated with emulsion and sand in my mother's garage. The next time was when the GW Design Studio was in Enfield Chambers in the centre of Nottingham City. John Blanche asked me to make some chaos terrain for the upcoming RoC publication. Some years later I started playing 40k with Andy Chambers who I had known from the Asgard days. This is when I actually started making terrain in earnest. In fact some of the pieces I made, being two tier, were what prompted Andy to write the first City Fight expansion rules. A picture of one of my pieces is on the back cover I believe. Anyway the real break through came much later. I was staying with George RR Martin, (Game of Thrones author), at his house in New Mexico. I was making him some scenery pieces to photograph his minis against. I was using my staple polystyrene shaped and coated in sand and paint when his wife Parris, handed me some foam board and said; 'have you tried this?' After that things went stellar. Its such a fantastic medium!


A chaos tree anyone?
RoC80s: Can you tell us how long it takes to complete a project or how much a piece may cost?

JS: The pieces take different amounts of time according to how large they are, if they have interiors or water sections etc. So it’s difficult to say. The Pyramid took about a month, but that’s full time. Also, I like to keep improving things. Generally they’re produced for games. So getting them to a functional state is the first concern. Then later they develop and finesse. For example, I’m midway through re-roofing a lot of the buildings now, with a much better tile effect.

RoC80s: Are the models we can see professional commissions or personal projects?

JS: All of these were produced for personal gaming. However I’m a maker by profession. I produce stage props, sculpture, models, illustrations, simple animations, diagrams, paintings, graphic line work etc. I have at present got two commissions for historically correct models of existing churches on my table. And yes, I take commissions, really for anything.

RoC80s: So do you have a favourite terrain piece?

JS: Ha! Favourite…. Mmm that’s tricky. They all hold different memories. I have difficulty with favourites. I mean if I named one, it might hurt the feelings of the other models…

RoC80s: So if I wanted to commission you to produce scenery, how would I go about it and how much would it cost?

JS: Contact me at my email address: j.sims2@btinternet.com. The price of a commission is completely dependent on the complexity of the piece or pieces the client is after... I would typically sit down and discuss with a client what they wanted and what budget they had, to arrive at a price that suited us both.


The Temple. One of Jamie's largest commissions. 
The Temple. It has a fully detailed interior, complete with skeletons!
Let this image give you some idea of the SCALE of Jamie's work!
RoC80s: You worked for Asgard Miniatures back in the early 1980s. What can you recall about the company?

Asgard in the early '80’s was Myself (the caster) Paul Sulley (the manager), Garry-Slim- Parsons (the mould maker) and Nick Bibby (the sculptor, par excellence) who worked from his flat. The rest of us were in a two room property in the Lace Market. This was the early '80’s and the Lace Market was very run down. These days, people would have snapped those properties up and renovated them as they were period pieces, stunning really. But back then, no one wanted them. So the rents were very cheap but we had NO amenities. No running water, no washing facilities. Not even a toilet! It was a different world. We all happily ate our lunches in a room with a lead melting pot. No ventilation. Absolutely no health and safety. It hadn’t been invented then!! We did a lot of mail order, to the States as well, and we used to import the first and subsequent Ral Partha miniatures. They were just incredible models. And what we didn’t know then, was that Tom Meier made those early sculpts aged just 16 ! Now that’s talent. The way it was run was that Paul made all the decisions, mostly without consulting his partners (Nick and Slim). The biggest example of this was the turning down of an offer of a merger with Citadel. That turned out to be the death knell of the company in my opinion. Asgard had the sculptors and a lot of really good ideas first. And what sculptors too! Nick Bibby and Jes Goodwin for goodness sake! The best in the business by a long, long way, this side of the pond at least. But Citadel had the manufacturing setup. And of course the later merger with GW. Yes that was, I believe, what they call a 'fatal' business decision. Asgard had had almost like a cult following then. There was a core of people that basically spent all their free time there. Amongst them some pretty big talents and names to be; John Blanche, Andy Chambers, Jes Goodwin, Nick Bibby, Tim Pollard, Slim, Asgard Chris, Andy Minor, Pank, Che and myself. It was a whirlwind time for me, being so young. And my life was undergoing huge changes. Although not the career move of the century at £30 a week I'm really glad I was there right at the start of the scene/hobby or whatever you want to call it. Back then it was really underground. No one in the mainstream knew what Dungeons and Dragons was. And it felt great to be a part of this fantastical other world, away from the dull reality of the time.


RoC80s: I don't really have a clue how miniatures were cast back then. Could you explain the process?

JS: Well I didn’t cast for Citadel, only Asgard. There was a melting pot, large ingots of lead, which everyone helped carry in from the lorry when it was delivered. A table covered in tiny fragments of vulcanizing rubber, lots of rubber moulds, lead bits all over, sprue, flashing and other casting detritus. Chip wrappers, coke cans, sandwich wrappers, cigarettes, butts and ash. And your trusty ladle. I'd switch the melting pot on, and once heated, take an ingot of lead, place it long ways up in the bowl, support it until it started to soften and melt, then lower it further in. If you just left it, it would drop suddenly and splash. If you daydreamed whilst supporting it, the same thing. At the time I was 16 and living in the flat below Nick Bibby in Carrington. I was paid the princely sum of £30 a week. One morning there was no food. Except a bottle of vodka. Being 16 I thought I’d try and make it through work on just that. I nodded off while melting two bars in at once. I got sent home that day. It was an early lesson in life. Anyway, the process was that you opened the centrifugal casting machine lid, put in a mould, closed the lid, started the machine, took a scoop of molten lead with your trusty ladle, and poured it in (in as even a flow as possible) into the mould through a hole in the centre of the lid. If you poured too fast it would clog, too slow and it didn’t fill the mould.Then you put your ladle down, stopped the machine, opened it, took out the mould and placed it on the table. Your work flow would be to pour, turn and empty the previous mould, turn back, stop the machine and take out the full mould, replace it with an empty. And start again. This was done in the the back room. I was the only caster, Slim was opposite me making moulds (with a very high degree of skill I might add) . And Paul would biuble in and out from the front room (shop with no counter) doing important stuff no one understood.

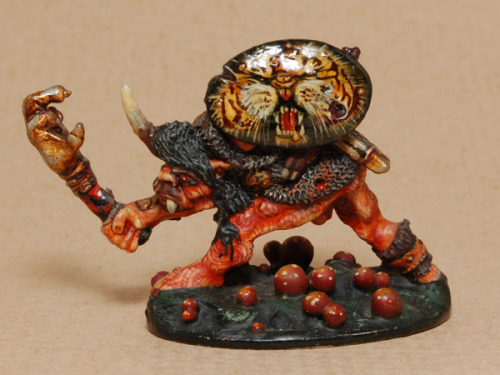
An example of one of John Blanche's Asgard Miniatures. Isn't that the greatest painted shield you have very seen? And I believe he used oils to do these! Photographed by Steve Casey.
More of John Blanche's Asgard Stuff. You can see these models, and a huge range of other Asgard stuff by John Blanche, on Steve Casey's blog, Eldritch Epistles
RoC80s: And what about the moulds themselves? How were they constructed?

JS: In a vulcanising press. Slim hand cut them first, laid in locating pins, chalked the whole thing, then it went into the vulcanising press. (Which was in the same room as the casting machine and melting pot. His skill at cutting in the shapes and also cutting air runs to the edge of the mould from the mini... awesome.Y ou know, he was having to guage , by eye and experience and just 'cleverness'; where the lead will need help flowing to. Then lines were cut by hand to allow release. Not too thick , or thin... This was highly skilled work. You can imagine, melting rubber, lead, fag smoke, no ventillation. Really even the windows were too small and old to open.... Health and safety? ha ha ! I'm still here! No one thought about health and safety.It just wasn't on the radar. At 14 my father died and it blew the family apart, literally. So as soon as I was 16, I left school , left home and got the job at Asgard. Left to my own devices as a kid that age however i had become practically feral within a year. And a few months after that, I started to realise I needed to go back to college. I'd always only ever been interested in art. And living in the flat below Nick Bibby I was constantly in awe of his creations. He was an extremely good painter as well as sculptor. I had my sights on art college and so I bit the bullet and went back to my mother's house and signed up for College and resat my exams. A few years later I been through the uni system. and bumped into John Blanche. He asked to see my work, and started to give me commissions here and there. The odd illustration, or a few days mini painting with the then fledgling 'Eavy metal team. And one day the terrain making for Realm of Chaos. I have to say those pieces I did were right at the start of my career and although great experience... they are not my best work shall we say.


Some of Blanche's 'crab claw' conversions.
RoC80s: So what of the wild tales? Readers of this blog seem never to be sated on amusing anecdotes? All these young (ish) guys working in such conditions all day must have resulted in a prank or two?

JS: One day we were packing a big order for the States. Paul was very excited. It was a big deal. We were all helping; as then, you put the minis in a little clear bag, and stapled a label on, having already hand written the code on said label. It took a while. Anyway, Slim was eating a bacon sandwich and such was the level of frenzy to get the order packed and off however; he forgot to finish it! In fact he’d put it into one of the half full boxes and someone else had put more minis in top of it. In those days it took a up to a month to get a package like this to its destination in America.You can imagine what it was like when it got there. The recipients actually took it in very good humour, considering how much it must have smelt by then! That same order also got some surprise 'dungeon debris' packs. Being young and stupid we thought it would be very funny to scoop up dust, fag ends and bits of lead, bag and label them as Dungeon Debris, with their own code. Amazingly, the recipients got the joke! Even commenting on it in a later missive. I can’t remember which company it was but they had a sense of humour. Now comes the Blanche ‘ Full -Liche wand Phallused- cloaked and cowled barbarian’ story! When Nick made the 28mm Conan cover inspired Barbarian, it was simply ‘The best 28mm mini made, to date, in England’. John Blanche used to come in regularly, buy minis or get given them in return for painted returns. John’s stuff was just so far ahead of anyone else it was dreamy to see it. The things he’d do.. conversions before anyone was doing that. And such amazing imagination. And as for the actual painting…. John invented wash and dry brush. Say no more. His ability was, within its field; nothing short of visionary. And he loved the barbarian. We used to joke ‘John bases everything on the Barbarian!’ The amount of wonderful things he did with that one mini. Also in Asgard's ranges, was a mini of a Liche. The Dungeons and Dragons module; Tomb of Horrors demanded that all self respecting D&D mini companies had a liche. So Nick made one, clutching an extremely phallic wand. I think it was meant to be a snake's head wand, (or maybe Nick was just bored?). Well John took a barbarian, added a cloak and cowl wrapped almost all the way around the figure, but just slightly open at the front. Exposing the new, upward jutting, ‘appendage’ the lucky barbarian had gained. It was laugh out loud funny but also, so well done, it was excellent. Subtle yet shocking. And painted perfectly. Really it was another sign of the times. And a testament to how John approached things as an artist. But can you imagine it now? 

In a shop display cabinet? 


You’d get lynched!!
And so ends another old school interview. I am sure that you all will agree that we need to thank Jamie for giving up his time to talk to us and share his wonderful models and memories. If you are interested in seeing more of his work, just follow the link below to his portfolio and feast your eyes on his output.
http://sticksnstones.info/portfolio.php
And his email address for commissions is...
j.sims2@btinternet.com

Orlygg.