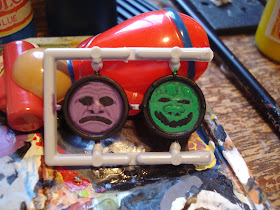
Over the last few months I have had a number of enquiries about the 'citadelesque' style of hand painted shields that I have been working on. I am often asked 'how do you do them?' or 'can you do a quick guide?'
Well, this afternoon sees me with little do do but paint and I fancied working on my shield painting, so I have whipped up this quick tutorial to producing the classic 'citadel face' that John Blanche liked to plaster across every surface back in the day.
A GUIDE TO PAINTING CITADELESQUE SHIELDS
To start with you need your shields. I prefer the large, circular ones though any shape shield will do. I always keep the shield on the sprue, this makes them far easier to work, and if they are loose I tend to blue tack them onto a fizzy drink lid. Undercoating is best done with a couple of layers of very thin white paint.
Choose your base colour. Again, like the white undercoat, do a couple of thin layers of your chosen shade to create a good coverage. Leave them out to dry completely until moving on to the next stage.
I like to use '80s inks, I prepare a wash in a darker shade of the base colour and wash this over the entire shield, with a deeper shade in the recess. This wash needs to be left to be totally dry before moving on.
At this point, you need to decide if you are going to mount the shields on a figure using a boss or plan to attach them flush. Here I have used a tiny blob of greenstuff to fill in the centre of the shields. Don't worry if you scratch off a bit of the paint at this stage.
Tidy up the shields by using your original base colour. Leave the edge shaded with the ink wash. Use a nice dark black to paint the outside of the shield.
While the base colour is still wet, carefully blend in the original shading wash once more. Ensure that a nice dark shade is in the recess around the rim. You might want to use a watery black ink for this.
Using slightly watered black ink, create the initial facial shapes for the eyes, nose and mouth. Don't worry too much about being precise at this stage, these are just guidelines.
Return to the base colour once more and begin to work up the detail. This needs to be pretty precise, though you may want to leave a little dark shading around the nose and eyes. Tidy up the mouth area here and it will pay dividends in the future.
Add the second stage of highlights by adding white to the base colours. This is the point you can start to build up the expression on the face. Creases on the forehead are good ideas as are lines around the nose and mouth.
Add further detail on top on that layer using a lighter shade (just add white) and, again, build up more detail. Highlight the lines on the face, nose and around the eyes and mouth.
The final highlight (again just add white to the mix) should include the final details around the nose, mouth and eyes. Highlight any wrinkles or creases here. Wait for this layer to be totally dry before proceeding.
Add some ink glazes. I used purple/blue mix on the left hand side and yellow on the right. You may want to experiment with this stage as the ink can create some startling effects. This will need to be totally dry before you move on!
Start adding the details. Use white to add the eye balls and teeth. Eyelids and lips are also added here. Try and use contrasting colours at this point. Make sure that your white paint is watered down so that it flows accurately from your brush.
Use black ink to add definition and detail. Highlight the eyes with a third colour and use white to create points of reflective light. Define the teeth carefully and add the pupils, eyebrows and nostrils.
Continue to add details using black and other coloured inks until you feel the design is complete. Don't overdo detail, less is definately more here. I leave the rim of the shields unhighlighted black (as was the case in the 80s) but you can also paint the studs a nice metallic colour. I have reduced the size of the image here to reflect the size that the shields would be on the figure.
INSPIRATION
You can draw inspiration from many places. Historical picture books have lots of interesting faces to copy, particularly gargoyles from medieval manuscripts and cathedrals.Of course, the master of the shield design was the original 'Eavy metal painter; Colin Dixon. Here are a collection of his designs from my Warseer Project Log.
Have fun painting those shields. The sky is the limit with these.
Orlygg.


Those shields are works of art!
ReplyDeleteDitto!
DeleteVery nice indeed - fine tutorial.
ReplyDeleteThe blacklining really makes them pop!
Annoyingly good... I really need to try this at some point.
ReplyDeleteGreat tutorial. I've always wondered how they did that.
ReplyDeleteHey isn't that Mrs Pontipine propping those shields up?
ReplyDeleteNice to see someone found a good use for the annoying squeaky little f@*&ers!
Album cover art makes awesome inspiration, too! I did a banner using King Crimson's first album as a reference.
ReplyDelete